How to EQ Piano: Frequency Guide, Settings & Tips for Every Mix
The piano is one of the most full-range instruments in music — it spans almost the entire frequency spectrum a human can hear (27Hz to over 4,000Hz, with harmonics extending well past 10kHz). That's what makes it so expressive, and also what makes it one of the hardest instruments to EQ without affecting the overall feel of the sound.
In this guide, we'll cover the complete process for EQing piano, with specific frequency targets, techniques for different mix contexts, and a quick-reference cheat sheet.
If you want more detail on mixing piano beyond EQ, check out this guide on making piano plugins sound lifelike and realistic. And if you're unhappy with how your piano sounds to begin with, here are the best piano VST plugins.
Piano EQ Process: Step by Step
Step 1: High-Pass Filter (Remove the Rumble)
Start with a high-pass filter. For solo classical piano, you might not need this at all — but in a dense mix with bass and drums, cutting everything below 30–50Hz cleans up the low end without affecting the musical content of the piano. This is non-musical rumble: room noise, mic stand vibration, air conditioning.
Use a gentle slope (12 dB/octave) rather than a steep one to avoid creating resonances just above the cutoff.
Step 2: Cut the Mud (50Hz–300Hz)

The mud range on piano is roughly 80Hz–300Hz. This is where most EQ problems originate:
- 80–120Hz: Boomy bass notes. Cuts here reduce weight — be careful, as this is also where warmth lives.
- 120–180Hz: Lower mids where muddiness builds up, especially when piano conflicts with bass guitar or low strings.
- 180–300Hz: The "cardboard" range — this is where piano can start sounding boxy and hollow. A narrow cut here often opens up the sound significantly.
A useful technique: use a narrow EQ band, boost by 6–10dB, and sweep slowly until you find the frequency that sounds the worst. Then flip the boost to a cut. This is called "sweep and destroy," and it works well for muddy piano sounds.
One important caveat: the 120–180Hz range is where piano and bass guitar often fight for the same space. Decide which instrument owns the low-mid spotlight and cut the other one at that frequency.
Step 3: Remove Resonances with Dynamic EQ
Acoustic pianos often have notes or chord voicings that cause certain frequencies to jump out unexpectedly — a particular note that rings too loud, or a sympathetic vibration in the body of the instrument. These are resonances, and they're best handled with a dynamic EQ or a tight notch filter.
The best tool for this is the FabFilter Pro-Q 3 in dynamic EQ mode — it only cuts the frequency when it's being excited, so you don't lose the body of the instrument during normal passages.

Use the Pro-Q 3's dynamic EQ mode to tame resonances only when they occur
Only do this step if you hear a specific problem. Don't go hunting for resonances with a 20dB boost sweep unless something sounds wrong — you'll end up cutting frequencies that are contributing positively to the sound.
Step 4: Broad EQ Boosts to Enhance the Sound
Once you've cleaned up the problems, use broad, gentle boosts to bring out the character you want. Use a wide bell or shelf — narrow boosts sound unnatural on piano.

- 120–300Hz (wide boost): Adds body and warmth. Great for solo piano that sounds thin.
- 1kHz–5kHz: Presence and bite. Helps piano cut through a busy mix.
- 5kHz–10kHz: Hammer attack — makes individual notes more defined and percussive. Good for pop and rock piano.
- 10kHz+ (high shelf): Air. Adds sparkle and openness without harshness.
A tube-emulating EQ (like the Tube-Tech Equalizer Collection) works particularly well for additive boosts on piano — the harmonic saturation from the analog modeling makes the boost sound warmer and more musical than a clean digital EQ.
Piano EQ Settings by Mix Context
Dense Mix (Pop, Rock, Hip Hop)
Priority: cut to make room. High-pass at 50–80Hz, cut 150–200Hz to reduce mud, cut anything competing with the bass guitar, boost 1–3kHz for presence. Keep piano out of the bass frequency range entirely.
Solo Piano / Acoustic Classical
Priority: preserve natural sound. Very gentle high-pass at 30–40Hz (rumble only), minimal cutting. Use additive EQ: boost 120–200Hz for warmth, boost 5–8kHz for sparkle if needed. Let the piano breathe.
Electronic / Synth Piano
VST piano plugins often have built-in EQ shaping, but in the mix you'll likely still need to high-pass (80–100Hz) and cut mud (200–300Hz). Synth pianos often have resonance issues in the 2–4kHz range — use the sweep and destroy technique to find and cut them.
Old-Fashioned / Upright Piano Sound
Cut everything below 200Hz and above 3kHz using steep high-pass and low-pass filters. Focus the sound on the 600Hz–3kHz range, add a slight boost at 1kHz for bite. Add gentle tape saturation for character.
Piano EQ Frequency Reference Chart
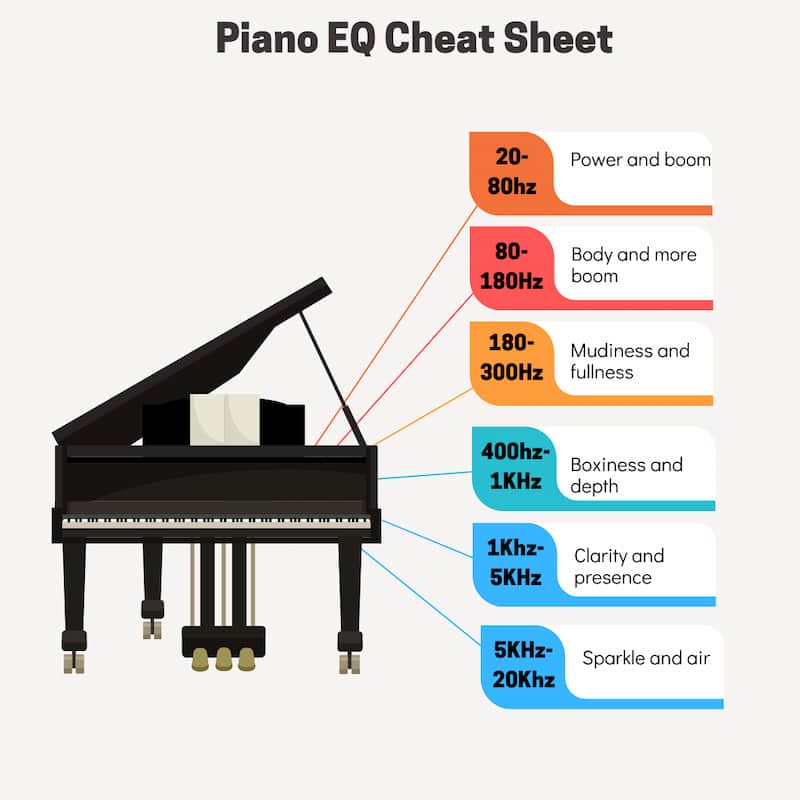
- 20–80Hz: Sub-bass — mostly non-musical rumble. Cut.
- 80–180Hz: Bass notes, warmth, body. Cut mud here carefully.
- 180–300Hz: Lower mids. Muddiness and boxiness live here.
- 400Hz–1kHz: Nasal and honky tone. Cuts here often open up the sound.
- 1kHz–5kHz: Presence, bite, clarity. Boost to help piano cut through a busy mix.
- 5kHz–20kHz: Sparkle, air, hammer attack. Boost for brightness.
The piano's full range spans from its lowest note (A0 = 27.5Hz) to its highest (C8 = 4,186Hz), with harmonics extending well above 10kHz. This full-spectrum nature is what makes EQing piano a challenge and a powerful tool for shaping the overall feel of a mix.
Frequently Asked Questions
What frequencies should I cut on piano?
In most mixes: cut below 50Hz (rumble), cut somewhere in the 80–300Hz range to reduce mud (use the sweep and destroy technique to find the exact spot), and cut whatever frequency is conflicting with your bass guitar or low strings. The exact frequency depends on your recording, but 150–200Hz is the most common mud culprit.
How do I make piano sound bright without harshness?
Use a high-shelf boost above 10kHz rather than a narrow boost in the 3–6kHz range. The shelf adds "air" without creating harshness. If you need more presence at 2–4kHz, use a very wide bell boost (low Q value) so you're lifting a broad range rather than creating a narrow spike.
Should I EQ piano before or after compression?
EQ before compression to remove problem frequencies, compress, then EQ again if needed for tone shaping. The standard signal chain: corrective EQ → compressor → additive EQ. This order means your compressor is reacting to a cleaner signal, which produces more consistent, musical results.
Why does my piano sound muddy?
Muddy piano is almost always a buildup in the 100–300Hz range, either from the recording itself or from other instruments occupying the same space. Start with a cut at 200Hz and sweep until you find the frequency making it sound "woolly." Also check whether your bass guitar or cello is occupying the same frequencies — one of them needs to yield that space.
What's the best EQ plugin for piano?
The FabFilter Pro-Q 3 is the best all-purpose option — its dynamic EQ mode is particularly useful for resonance control on acoustic piano. For warm, analog-style additive boosts, try the Tube-Tech EQ or any good vintage EQ emulation (Neve 1073, API 550 style).
How much should I EQ piano?
As little as possible. The best piano EQ is mostly subtractive — removing problem frequencies rather than adding new ones. If you're boosting more than 3–4dB anywhere on a piano, you're likely fighting a recording problem rather than a mixing problem. Consider re-recording or using a different sample library.
More EQ Guides
- How to Mix with EQ
- Electric Guitar EQ Tips
- How to EQ Acoustic Guitar
- How to EQ Bass Guitar
- How to EQ Drums
- How to EQ Vocals
- How to EQ Woodwinds
- How to EQ Strings
- How to Use Mid-Side EQ
- 3 Powerful Ways to Use Dynamic EQ
From Great Mixes to Passive Income
If you're producing polished piano tracks, they could be earning money on stock music platforms. Learn the complete system in the free 5-Day Music Licensing Crash Course.
Get the Free Crash Course →From a Frustrated Producer in a Ragtag Bedroom Studio to Major Placements on TV Earning $1,000s!
My name is Evan, and I've been making music since around 3rd grade. I'm from San Diego, California, but I've lived in Washington, DC for the last 20 years.
While I still have a full-time day job, I have created systems that have allowed me to produce dozens of songs a year in my spare time.
My songs have been on Netflix, TV shows like the 90 Day Fiance, an award-winning indie film, and NPR’s “All Thing Considered.” They've also been streamed millions of times.
In addition to being a music producer, I am passionate about teaching people how they can make professional-sounding music and earn money licensing it, all in their spare time.
Thousands of musicians, like yourself, have trusted me to guide their musical journey. My YouTube videos have been watched nearly a million times. And my story has been in Forbes, Side Hustle Nation, and the Side Hustle School.


EQ is the most essential tool you have for making music sound clean, clear, and professional. In this book you'll learn how to use the R.O.S.E. System, a simple 4-step EQ formula to help you master the world of EQ
